So…you could just go and buy those little Organic baby food pouches, which I’m sure are super convenient, but I have a few beefs with them…
- They contain preservatives and things on the label that I can’t read, let alone understand, let alone want to put into my baby’s belly!
- They are RIDICULOUSLY expensive! Like upwards of $1.50 per pouch and Pebbles I’m sure could easily pound 3-4 of those a day! That makes around $4.50-$6 a day to feed her (NOT including formula), which makes for around $140-$180 a month! I SOOOOOO don’t have that kind of extra money to feed her each month!
- They are packaged in plastic and have I mentioned that I’m a plastic-phob?
Needless to say, I make my own organic baby food, and it saves me soooo much money! And I must admit, it’s actually kind of fun and liberating!
While I fear telling you my baby food making secrets out of fear that I’ll lose my credibility, coolness, and sense of wonder awe and amazement, I’m going to let you in on my secrets anyway. Just remember that I am still pretty freaking awesome! (Bursting my own bubble here!)
Here are the basics for the first stage of baby food (great for ages about 5-8 months)
- Over a pot of boiling water, place a metal colander so that it sits down in the pot, but not in the water.
- Chop up your veggies or fruit into small and even pieces. You want the pieces to be even so that t
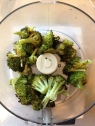 hey cook evenly, and the smaller you chop things, the less time you have to spend steaming them.
 - Steam food until fork tender
- Place steamed food into either a food processor, a blender (this is a little harder, but works), or a mixing bowl so you can use an immersion blender.
- Puree your food until desired consistency (for baby’s first foods you will want to make it as smooth as possible because they don’t handle texture very well)
- If needed, add water (1 Tablespoon at a time) from your steaming pot to smooth or thin out until you get the
 desired consistency. Some foods like zucchini already have a lot of water in them, so you don’t really need to add anything, but other things like broccoli tends to need a little bit of water added.
 - Pour into glass jars and store in the freezer (for up to a month) or fridge (for a few days). I love using the Ball brand jelly jars (4 oz. size)…I have several sets of them so all of my food is stored in the same jars.

As your baby grows and gets better at eating you can start making things more complex. Try roasting your veggies with a little bit of olive oil instead of just steaming. You can also combine different foods to make more complex flavors. And start adding in a little bit more texture as your baby can start to handle it, and certainly when they start to get some teeth! Pebbles just had her 2 bottom teeth pop through this week past week and it’s fun to watch her trying to chew her food more rather than suck it down. This week I’m going to try making a chicken and sweet potato puree that’s a little bit chunky. I’ll keep you posted on how it goes!
Really it’s so easy and well worth the time! I usually make up huge batches at a time so I only have to make her baby food every couple of weeks. It takes me about 2 hours (a perfect nap time) to whip up several weeks worth of food.
We even use some of the baby food in our own cooking. It’s great for sauces, and we even use it straight out of the jar to flavor up eggs, meat, etc. I have to start making more of the butternut squash baby food because I literally can’t keep my husband from using it in his meal creations!


Leave a comment